First Boot Configuration: Permanently Disable Unnecessary Windows Services

After a clean Windows installation, the first boot is your golden opportunity to take control of your system — before Windows tries to take control of you.
By default, Windows 10 automatically enables dozens of services, scheduled tasks, and telemetry agents that are not only unnecessary for gaming but are also known to cause:
FPS drops and stutters
Network latency and input lag
CPU spikes and disk activity
Unwanted background downloads or reboots
This guide will show you how to permanently disable all non-essential services, including search, Defender, SmartScreen, and UAC.
❌ Services & Features to Disable Immediately
These components must be disabled before you connect to the internet, otherwise Windows may re-enable them or make removal more difficult.
| Service / Feature | Why Disable It? |
|---|---|
| Windows Defender & Antivirus | Uses RAM, CPU, and I/O even when idle |
| SmartScreen | Slows down downloads and app launches |
| UAC (User Account Control) | Adds unnecessary prompts; causes issues in emulators |
| Windows Update | Eats bandwidth, installs drivers, resets settings |
| Windows Telemetry | Sends usage data constantly in the background |
| Windows Search / Indexing | Constantly scans and indexes files in real-time |
| Windows Error Reporting | Generates unneeded crash logs and uses disk I/O |
| Superfetch (SysMain) | Predictive caching system that slows down boot-up |
| Diagnostic Policy Services | Background logging of network/device health |
Full Disabling Checklist (Step by Step)
Disable Windows Defender Completely (via Group Policy)
We’ll disable Microsoft Defender Antivirus entirely using Group Policy Editor and also ensure that Real-time Monitoring, Cloud-delivered Protection, and Behavior Monitoring are disabled so no background protection remains active.
💡 These settings are only available in Windows 10 Pro editions or higher. If you’re using Home, use the registry method
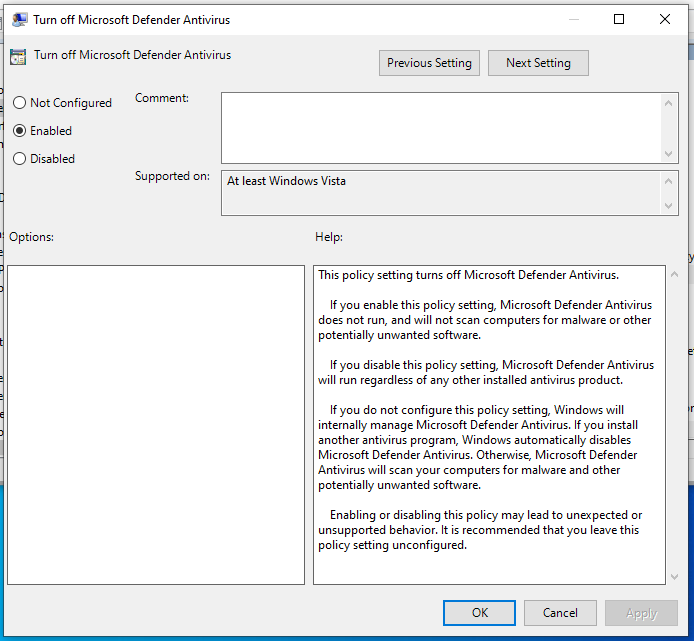
📍 Step-by-Step: Turn Off Microsoft Defender Antivirus
Press
Windows + R, typegpedit.msc, and press Enter
(This opens the Local Group Policy Editor)Navigate to the following path:
Computer Configuration > Administrative Templates > Windows Components > Microsoft Defender AntivirusOn the right panel, double-click on Turn off Microsoft Defender Antivirus
Select Enabled, then click Apply > OK
📍 Also Disable the Following Policies:
Under the same folder, look for and configure the following settings:
Real-time Protection
Double-click “Turn off real-time protection”
Set to Enabled
Cloud-delivered Protection
Navigate to:
Computer Configuration > Administrative Templates > Windows Components > Microsoft Defender Antivirus > MAPSDouble-click “Send file samples when further analysis is required”
Set to Disabled
Behavior Monitoring
Navigate to:
Computer Configuration > Administrative Templates > Windows Components > Microsoft Defender Antivirus > Real-time ProtectionDouble-click “Monitor file and program activity on your computer”
Set to Disabled
🔁 Restart your system for all changes to take full effect.
Disable SmartScreen (via Group Policy)
SmartScreen filters downloads and app launches, but introduces unnecessary delay and background checks.
📍 Step-by-Step: Disable SmartScreen
Press
Windows + R, typegpedit.msc, and press EnterNavigate to:
Computer Configuration > Administrative Templates > Windows Components > File ExplorerDouble-click “Configure Windows Defender SmartScreen”
Set it to Disabled, click Apply → OK
Disable User Account Control (UAC)
UAC interrupts background tasks and causes issues in emulators like GameLoop when attempting to elevate processes.
📍 Step-by-Step: Disable UAC
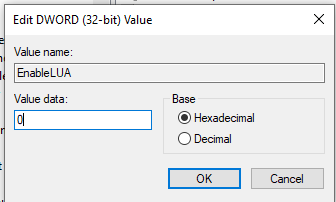
Press
Windows + R, typeregedit, and press EnterNavigate to:
HKEY_LOCAL_MACHINE\SOFTWARE\Microsoft\Windows\CurrentVersion\Policies\SystemDouble-click the value named EnableLUA
Change the value from
1to0Click OK, then restart your PC
Disable Windows Update (Fully)
Even if paused temporarily, Windows Update can re-enable itself via scheduled tasks. We’ll block it through both Services and Group Policy.
📍 Disable via services.msc:
Press
Windows + R, typeservices.msc, and press EnterFind Windows Update, right-click → Properties
Set Startup type to Disabled
Click Stop if running, then Apply → OK
📍 Disable via Group Policy:
Open
gpedit.mscNavigate to:
Computer Configuration > Administrative Templates > Windows Components > Windows UpdateDouble-click “Configure Automatic Updates”, set to Disabled
📍 Disable Windows Telemetry & Diagnostic Data Collection
Windows Telemetry is a background service that continuously sends diagnostic and usage data to Microsoft. While useful for enterprise analytics, it adds unnecessary CPU and network load for a gaming-focused system. Here’s how to disable it completely:
Step 1: Disable Services via services.msc
Press
Win + R, typeservices.msc, and hit EnterLocate the following services:
Connected User Experiences and Telemetry (
DiagTrack)dmwappushsvc (WAP Push Service)
For each service:
Right-click → Properties
Set Startup type to Disabled
Click Stop, then Apply → OK
💡 Note: If dmwappushsvc is not listed under services, it means your system doesn’t have it installed — no action needed.
Step 2: Disable via Registry Editor (Optional for full lockdown)
Press
Win + R, typeregedit, and press EnterNavigate to:
If the
DataCollectionkey doesn’t exist, create it.Inside this key, create a new DWORD (32-bit) value:
Name:
AllowTelemetryValue:
0
Close Registry Editor
Done! Windows Telemetry is now fully disabled.
Note: This change improves gaming performance but disables all Windows usage reporting. It’s recommended only for isolated, gaming-only systems.
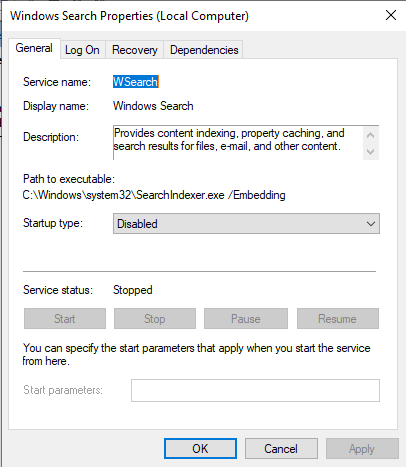
Disable Windows Search & Indexing
This service scans your files constantly in the background and adds unnecessary disk activity.
📍 How to Disable:
Press
Windows + R, typeservices.msc, and press EnterFind Windows Search, right-click → Properties
Set Startup type to Disabled, then Stop the service
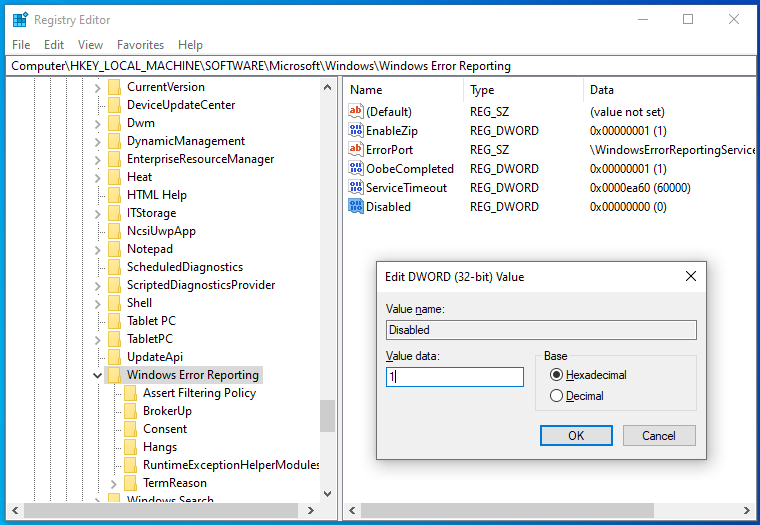
Disable Windows Error Reporting
This service generates logs and attempts to send crash data to Microsoft — completely unnecessary for a dedicated gaming system.
📍 Registry Method:
Press
Windows + R, typeregedit, and press EnterNavigate to:
HKEY_LOCAL_MACHINE\SOFTWARE\Microsoft\Windows\Windows Error ReportingRight-click the right pane → New → DWORD (32-bit) Value
Name it Disabled and set the value to
1
Disable Superfetch (SysMain)
This “performance enhancer” actually causes lag and boot delays, especially on SSDs or emulators.
📍 How to Disable:
Press
Windows + R,typeservices.mscLocate SysMain, right-click → Properties
Set to Disabled, click Stop → OK
Disable Diagnostic Policy Service
This service logs device and network errors in real-time, consuming system resources needlessly.
📍 How to Disable:
- Press
Windows + R,typeservices.msc Find Diagnostic Policy Service, disable it using the same method as above
- Restart your system
✅ Final Optimization Checklist
Before installing GameLoop, this is your last chance to strip down Windows and ensure maximum performance.
Remove all unnecessary apps and features that Windows comes bundled with — such as Xbox Game Bar, Cortana, Weather, Mail, Calendar, OneDrive, and more.
Not all components can be removed easily, and that’s okay. Just uninstall or disable what you can. No need to force it — this step is a lightweight cleanup to eliminate obvious bloat.
💡 Suggested removals include:
Xbox Game Bar & Game Services
Cortana
Weather, News, Calendar, Mail
OneDrive (if not used)
3D Viewer, Paint 3D, Mixed Reality Portal
Microsoft Store games or trialware (e.g. Candy Crush)
You can do this via:
Settings → Apps → Installed apps
Or using PowerShell for deeper removals (advanced users)
🧼 The fewer distractions, the more stable and efficient your GameLoop environment will be.
Optional: Disable Windows Firewall for Maximum Performance
If you want to eliminate all background network filtering and logging, you can also disable the Windows Defender Firewall permanently. While this improves performance and system responsiveness, it exposes your system to potential threats if connected to the internet.
This step is only recommended if you’re using this system exclusively for GameLoop.
Read Full Guide: Disable Windows Firewall Permanently
🔐 Security Warning
⚠️ You have now disabled all active security measures in Windows. This system is not safe for general use or web browsing.
🔒 Only use it to play games via GameLoop in a controlled environment.